
Lock Blog
A resource for consumers, locksmiths, and security professionals
A resource for consumers, locksmiths, and security professionals
A disk detainer lock is a unique type of security device. The potential that it offers to the security is unique to its characteristics. But what exactly are those characteristics? What makes a disk detainer different than other locks? Does it use the same pin tumbler system as so many other locks? We will be discussing the main uses of disk detainer locks, the parts of the locks, and how they work. With this background, we will be able to better understand how these locks can be picked and the other ways they can be exploited. All of this information exists for educational purposes and should not be used for criminal activity. Once you are educated on these types of products, it will be easier to make a purchasing decision. Learn about this lock, and discover if disk detainers are the right choice for your security needs.
Disk detainer locks are not all that common in everyday use. Mainly this style of lock is reserved for very high-end padlocks. Besides being used on some of the best padlocks, there are quite a few not so high-end padlocks that use this technology. Therein lies the rub of disk detainer locks. There are very few companies that make them well. Brands such as Abus, Kryptonite, and Abloy have used this technology to make truly exceptional products. Abloy is even credited as the first to create a disk detainer lock. Inventor Emil Henriksson first implemented his creation in 1907 with the Abloy Classic. Since the creation of the lock, there have been many improvements and many failings. The largest failing has been low-quality knockoffs, made predominantly in China, which are only good as lock pick practice locks. Though not all Chinese disk detainers are horrible, a large majority of them are. Because of the wide availability of the lower end Chinese locks, and the high cost of quality locks, most disk detainers that are in use are not very secure locks.
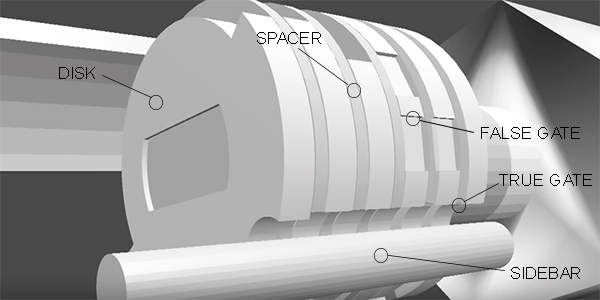
Disks – The disks in a disk detainer lock are the components that the key will directly interact with. These elements have grooves that keep them from being perfectly circular. These grooves are referred to as gates.
Spacers – These pieces rest between two disks. Spacers are completely open in the middle. Each spacer will have a gate of their own, that is always lined up with the sidebar.
True Gates – Each disk needs to have a true gate. The main purpose of a true gate on each disk is to create a uniform groove so that the sidebar can fall into place. When the true gates are moved into the correct position the sidebar will fall into place and no longer restrict the rotation of the plug. A true gate will be the deepest groove on the disk.
False Gates – This type of gate acts as a security measure. With false gates, manipulation will be made more difficult. A false gate is a groove that will not align the sidebar to the correct height. It will, however, give the feedback to the picker that the sidebar has fallen into a gate. False gates will be shallower than the true gates.
Sidebar – The sidebar is the primary locking mechanism in disk detainer locks. Its main purpose is to restrict the movement of the plug. While the gates are misaligned, the bar will be elevated in a way to jams up the internal workings of the lock. When the proper gates are moved into position, the bar will fall evenly into the trough similar to pins reaching a shear line.
Disk detainer locks have as much variety as pin tumbler, lever locks, wafer locks, etc. The complexity of this type of lock can vary from extremely simple, to extremely complicated. However, despite the variety, the basics characteristics of disk detainer locks remain the same. The key to the lock will run through the length of the cylinder, entering the hole in each disk. As the key rotates in the plug, the disks are aligned. By being aligned, all of the true gates will form one trough extending the length of the sidebar. The sidebar will fall into the trough, which will free up the plug to rotate. The rotation of the plug will open the lock by releasing the locking dogs, rotating a cam, etc. Just like a standard pin tumbler, the bitting of the key corresponds to the individual mechanisms in the lock. The bitting for the keys are the angles that are cut on the sides. Those angles will line up with the gates on the disks so that key rotation will catch the disks and stop moving them after they have reached the proper orientation.
Pick Tip – The tip of the pick is used to manipulate the disks inside of the lock. It will often be removable from the pick handle.
Tension Handle – The tension handle fits over the shaft of the pick handle like a washer over a screw. It will be shaped like a donut with two bolts protruding from either side. There will also be a sheath type of metal that will slide over the shaft of the pick handle. The sheath will need to be placed in the keyway, so the rotation of the handle can tension the lock. When pressure is applied to one of those bolts in either an upward or downward motion, the lock is tensioned.
Pick Handle – This part will have a shaft, and often an end piece for better gripping. The shaft will almost always have a screw (Allen or other) that can be used to secure or remove the pick tip. The gripping end is used to stop the tension handle from coming off, as well as provide a better grip to twist and turn the pick tip in the lock.

Though disk detainer picks are not something you find in your beginning lock pick set, they are certainly lock pick tools that you should think about purchasing. Refining your disk detainer pick is going to take some work. It is very important that the shaft of the pick handle is smooth. The pick works off of the sliding of one piece of metal over the other, so if that surface is rough, picking each pin individually will be much more difficult. Begin by taking apart the pick. On the standard disk detainer picks, this is as simple as removing the Allen screws from the shaft of the pick handle. This will release the pick tip, allowing the tension handle to slide off the pick handle. Sand and polish the shaft of the pick handle until it has a mirror finish. It is kind of difficult to polish the inside of tension handle (the surface that will slide against the shaft of the pick handle), but you should be able to roll up a piece of sandpaper and slide it around the inside.
Once the metal pieces are sliding over each other nicely, the pick tip will often need to be refined. The end result you are looking for with your pick tip is something that resembles a flag. Flags are also known as dimple picks. A flag is bent at a 90-degree angle, so it resembles and ‘L’ and that ‘L’ is flattened. Instead of an ‘L’ you are looking for that bend on both sides of the tip, appearing more like a ‘T’. Once the metal pieces are sliding over each other nicely, the pick tip will often need to be refined. The end result you are looking for with your pick tip is something that resembles a flag. Flags are also known as dimple picks. A flag is bent at a 90-degree angle, so it resembles and ‘L’ and that ‘L’ is flattened. Instead of an ‘L’ you are looking for that bend on both sides of the tip, appearing more like a ‘T’.
Very often the disk detainer picks will come with so much extra metal on the tip that the tip will resemble a square. A pick tip that is too wide will move more than one disk at a time. Depending on the type of disk detainers you will be picking, you may need to take as much as half of that metal off. The final width should be somewhere around 1.5 mm (0.06 inches). To take off the excess metal, a standard file should do the trick. Once the filing is done, the tip should be sanded and polished. When you are sanding down the tip, try to round the shape of the ‘T’ so that a bird’s eye view has the top of the tip looking ovular.
Because the pick will need to rotate the disks inside the lock, a rounded and smooth shape will roll better against the internal mechanisms. Once the pick tip is refined, and all the parts are polished, reassemble the pick by first sliding the tension handle over the shaft. Then place the pick tip into the shaft, at the appropriate depth and then fasten the Allen screws. Put a few drops of oil onto the shaft and slide the tension handle back and forth a few times. After all of this prep, your tool should work very smoothly, which will give you straightforward and clear feedback. Some form of spray lubricant can also be used in the keyway to assist with the smooth movement of the inside parts of the lock.
Once the pick is ready, you can begin manipulating the lock. Start by zeroing all the disks. What that means is that all disks should be rotated fully to one side. The direction that the disks are rotated in is inconsequential. The only thing that matters about the direction is that every disk is rotated the same way, ie. all clockwise or all counterclockwise. To do this, inject the pick tip into the keyway to varying depths, and turn the device one way. For quicker zeroing you can use a flat piece of metal and turn all the disks at once. At this point, you will be finding out quite a bit about the internals of your lock.
The type of feedback you get will tell you the number of disks that your lock has. This process will also give you some insight into how well the lock is constructed. If the lock is made cheaply there are going to be certain tells while picking. Firstly, the polishing on the internal components might be anywhere from poor to nonexistent. That, along with metal shavings from the machining of the lock, is going to send a lot of feedback to the pick. It will feel like the components are grinding on one another. The disk may also have no false gates. Without false gates, it will be much easier to feel the feedback of a sidebar dropping into the gate. Most disk detainer locks have 6 to 8 disks. The more disks the higher the security.
Once you have a better understanding of the interior of the lock it is time to start picking. Whatever way you have rotated your disks, it is now time to rotate them back the opposite way, one at a time. You will begin to look for the binding disk. Personally, I always start picking from the back of the lock, and pick back to front, but that is entirely up to you. Once you have decided that a disk is not binding, go ahead and reset that disk to zero (fully rotate it to either clockwise or counterclockwise depending on your original choice). As you rotate experiment with your levels of tension. The greater the amount of tension, the stronger the feedback will be when the sidebar falls into a gate.
Once the sidebar has fallen into a gate, you should be able to rotate the disk slightly and feel the bar sliding around in the groove. When you are dealing with a lock that has false gates, it will be more difficult to determine if the gate is true or false. The method that leaves this decision up to skill and not fate can be time-consuming. You will need to go back and forth on each disk to judge whether one groove is shallower than another. The deepest groove is the true gate. Once all the correct gates are properly aligned the lock will open.
There are several ways that the cheaper disk detainers can be exploited without picking. These methods will not work on every brand or model of disk detainer because they rely on the use of low-quality materials. Bill Johnson, in his experimentation with these types of locks, discovered any Chinese made disk detainer padlocks that have a retaining ring that fits around the keyway is susceptible to a very simple exploit. By prying the retaining clip off the contents of the lock will fall out. In order to pry most of these clips all, you will need it a flat blade screwdriver. Insert that screwdriver into the keyway and pry up on the side of the clip. As long as the sidebar can be removed by opening the lock this way, the shackle will release once the casing is pulled out or rotated by hand. Torque is another way that cheaply made disk detainer padlocks can be exploited. Sometimes the casing or body that rotates to retract the locking dogs is made of plastic. Torque will work great with a plastic housing, but it can also work with very cheap or thin metal. Essentially, all that needs to be done is put a piece of metal with a similar size to the key in the keyway. With a socket wrench or some other leveraging tool, rotate the core. By bending and warping the casing, the locking dogs will be able to retract.
Like every type of security, disk detainers can be incredibly secure, or offer almost no protection. Everything comes down to the construction of the lock. How well is it machined? Has there been more security measures placed in the device? What are the materials that the lock’s components are made out of? Any compromise in construction is a detriment to the lock’s security. Be careful about this wide variance of quality if you are using these locks to secure your property. With your disk detainer picks, make sure that the product is made in a way that is not going to make it more difficult for you to open these locks. When exploiting any of the non-pick based weaknesses, take into account the destructive potential. Locks that have had their interior components ripped open will be too compromised to put back together and use. None of this information should be used to pick locks that you do not own, or have not been given the expressed permission of the owner to open. For your own security, do not attempt to pick any locks of your own that are currently in use. Be aware of your protections, and take your security seriously.
Category: Lock Picking, Lock Types, Tools of the Trade
